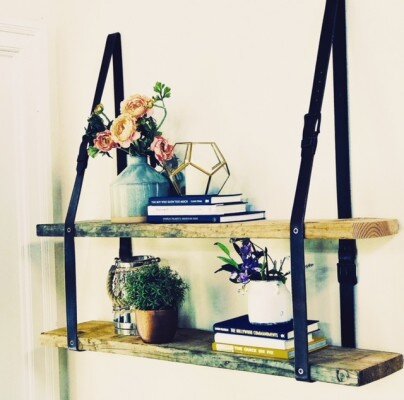
Leather Belt Shelving
I love leather belts. I love rustic wood planks. So.....why not put them together into some useful (and chic) shelving. I was truly shocked how easy this was to put together, an impressive DIY for any of you putting off your first project!
MATERIALS
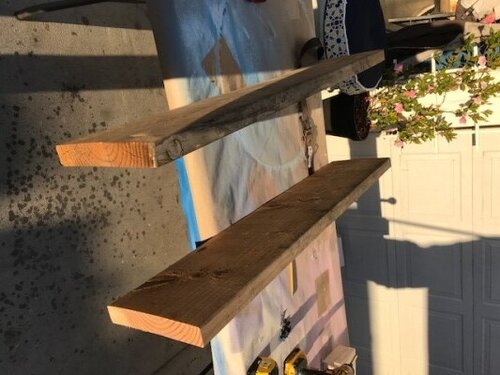
2 - 2” x 8”x 44” boards, reclaimed is great, but the hardware store will gladly cut new ones for you.
4 - XL leather belts
12 - 2” screws
12 - washers
STEPS
Stand your boards on end and mark 6” in from each end on both sides of each board. This should give you 32” between the two lines. By doing this, the belts will line up with the studs in your walls and when you go to hang them life will get a lot easier. Feel free to adjust the sizes if you’re going into a solid wood wall or beam or just make sure to use wall anchors.
Latch the end of one belt into the buckle of another so you have one super long belt. Repeat with the other pair. Just make sure to use the same hole on each so they’re the same length. Lay one of them over your boards, centering them on the lines you made. Position the buckle 14” up from the shelf. Attach the belt using a screw and washer.
Measure down the belt 13”. Feel free to increase or decrease if you want your shelves to be closer or further apart. Position the second shelf under this point at your pencil mark.
Screw the belt to the second shelf in the same way.
Repeat this on the other end of the shelves.
Flip the shelves over, wrap the belt tightly under the bottom shelf and screw it to the shelf at your 32” pencil mark. Measure up 13” and screw into the top shelf. Your second buckle will probably end up somewhere between the two shelves.
Mark Steines and Debbie Matenopoulos welcome country music singer Moe Bandy. Actress Saffron Burrows discusses her one-woman show about Jackie Kennedy, “Jackie Unveiled.” Chef Jenné Claiborne prepares oyster mushroom étouffée. "Hot Mess Kitchen" authors, Gabi Moskowitz and Miranda Berman whip up their cheap chicken legs. Television producer and “Journey of the Heart” author, Richard Crystal talks about undergoing open-heart surgery and profound effect it had on him and his loved ones. Debbie bakes a maple chestnut loaf cake. Maria Provenzano shows us DIY tea bag charms. Ken Wingard repurposes old leather belts into a shelf. Orly Shani has a DIY children’s faux handbag dress. Kym Douglas is here with tips to extend the life of a blow dry. Credit: © 2018 Crown Media United States, LLC | Photo: Alexx Henry Studios, LLC / Erica Avila
Now buckle the belt on each side and you’re ready to hang. Use a screw and washer at the top and go right into a stud as I mentioned before. Once you have two screws in at the top of each belt, add two more screws and washers a bit further down on the wall for additional support.
Mark Steines and Debbie Matenopoulos welcome country music singer Moe Bandy. Actress Saffron Burrows discusses her one-woman show about Jackie Kennedy, “Jackie Unveiled.” Chef Jenné Claiborne prepares oyster mushroom étouffée. "Hot Mess Kitchen" authors, Gabi Moskowitz and Miranda Berman whip up their cheap chicken legs. Television producer and “Journey of the Heart” author, Richard Crystal talks about undergoing open-heart surgery and profound effect it had on him and his loved ones. Debbie bakes a maple chestnut loaf cake. Maria Provenzano shows us DIY tea bag charms. Ken Wingard repurposes old leather belts into a shelf. Orly Shani has a DIY children’s faux handbag dress. Kym Douglas is here with tips to extend the life of a blow dry. Credit: © 2018 Crown Media United States, LLC | Photo: Alexx Henry Studios, LLC / Erica Avila
Now see how easy and fabulous that was.


