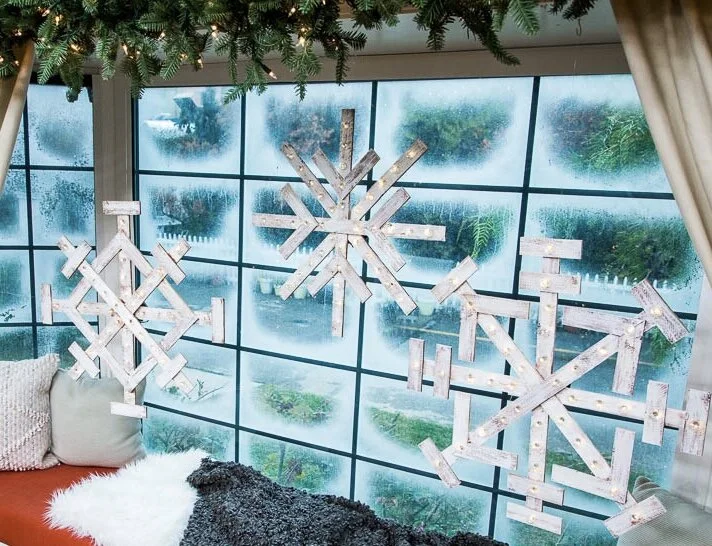
Light Up Snowflakes
Debbie Matenopoulos and Cameron Mathison welcome actress Jerrika Hinton from the Hallmark Channel original movie “A Majestic Christmas." Actress Aimee Teegarden from the Hallmark Movies & Mysteries original "Once Upon a Christmas Miracle" visits our home. Actors Emily Osment and Ryan Rottman talk about their Hallmark Movies & Mysteries original "Christmas Wonderland." Chef Aida Mollenkamp cooks crown roast of pork. Actress Christy Carlson Romano from Disney’s “Kim Possible” makes cannolis. “Out of the Box Desserts” author, Hayley Parker is here with Christmas cracker stackers. Celebrity florist Amy Marella has a beautiful holiday floral arrangement. Ken Wingard creates illuminated snowflakes. Lawrence Zarian shows us snowy fashions. Larissa Wohl shares heartwarming Happy Tail pet adoption updates. Credit: © 2018 Crown Media United States, LLC | Photo: jeremy lee/ Alexx Henry Studios, LLC.
Nothing says winter wonderland like oversized, light up snowflakes! These are made from inexpensive wood strips and a few strings of holiday lights. No freezing temperatures required.
MATERIALSWood lath (1/4” x 1 1/2” x 6’) - a bundle of 10 will be about $8.00White paintDrillHot glueHoliday lights - I used these mini-globe lights which I’m currently obsessed with
STEPS
Debbie Matenopoulos and Cameron Mathison welcome actress Jerrika Hinton from the Hallmark Channel original movie “A Majestic Christmas." Actress Aimee Teegarden from the Hallmark Movies & Mysteries original "Once Upon a Christmas Miracle" visits our home. Actors Emily Osment and Ryan Rottman talk about their Hallmark Movies & Mysteries original "Christmas Wonderland." Chef Aida Mollenkamp cooks crown roast of pork. Actress Christy Carlson Romano from Disney’s “Kim Possible” makes cannolis. “Out of the Box Desserts” author, Hayley Parker is here with Christmas cracker stackers. Celebrity florist Amy Marella has a beautiful holiday floral arrangement. Ken Wingard creates illuminated snowflakes. Lawrence Zarian shows us snowy fashions. Larissa Wohl shares heartwarming Happy Tail pet adoption updates. Credit: © 2018 Crown Media United States, LLC | Photo: jeremy lee/ Alexx Henry Studios, LLC.
As we all know, all snow flakes are different. So, here’s how I made one style of mine, but definitely feel free to get creative!
Cut 4 lengths of lath to 24”. Attach two pieces together using hot glue to create a plus sign. Repeat with the other two.
Attach the pluses together to create a starburst.
Cut eight 6” pieces and cut one end at a 45 degree angle. Attach in pairs to four of the starburst ends.
Cut four 5” pieces and attach to the other four starburst ends.
Drill holes along the arms large enough to fit the holiday lights. For mine, 1/4” holes were perfect.
Once you’ve got all your holes drilled, paint your snowflake. I used a watered down white paint to give a rustic white wash effect.
Remove the glass globes from your lights and slip the bulbs through the holes from the back.
Add the globes on from the front.
Replace the plug that holds the globe on from the back.
You’ll have to run up and down the arms from the back. When running back down the arm, remove the globes and let the lights just rest on the back. It takes a little configuring but I could light each flake with 2 strings of lights.
Once you’ve got all the holes filled, gather the extra wire on the back and use drops of hot glue to hold them in place and out of sight.
Then attach the battery packs to the back of the flake using hot glue again. Make sure you attach them so you still have access to the batteries.
Debbie Matenopoulos and Cameron Mathison welcome actress Jerrika Hinton from the Hallmark Channel original movie “A Majestic Christmas." Actress Aimee Teegarden from the Hallmark Movies & Mysteries original "Once Upon a Christmas Miracle" visits our home. Actors Emily Osment and Ryan Rottman talk about their Hallmark Movies & Mysteries original "Christmas Wonderland." Chef Aida Mollenkamp cooks crown roast of pork. Actress Christy Carlson Romano from Disney’s “Kim Possible” makes cannolis. “Out of the Box Desserts” author, Hayley Parker is here with Christmas cracker stackers. Celebrity florist Amy Marella has a beautiful holiday floral arrangement. Ken Wingard creates illuminated snowflakes. Lawrence Zarian shows us snowy fashions. Larissa Wohl shares heartwarming Happy Tail pet adoption updates. Credit: © 2018 Crown Media United States, LLC | Photo: jeremy lee/ Alexx Henry Studios, LLC.
Hang with fishing line and belt out Let it Snow!


